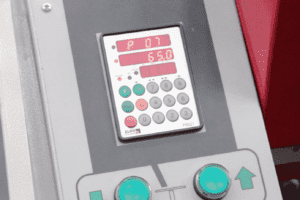
Debunking myths is always a useful thing, and the main ones surrounding controllers such as the Elgo P9521 is that they are occasionally seen as complicated, great to use but often tricky to set up and get the most out of, that couldn’t be further from the truth.
Watch our engineer demonstrate how to program an Elgo P9521 to a guillotine and see for yourself, no jargon, no degrees in computer science and not an I.T boffin in sight.
At its heart the Elgo P9521 is basically a controller that is all about versatility and adaptability with three main methods of programming; the Touch and Go program delivers a single movement once, then there is the Manual option and Programmable mode which will deliver up to 10 different cuts of different sizes.
Touch and Go
To start the demonstration our engineer has left the controller in Touch and Go mode. You might notice that the preset figure has been cancelled and our knowledge base engineer has programmed a new figure and then pressed start. This has programmed a single movement.
Manual Programming
If you press F again, you’ll see the light comes on where the picture of the hand is. You will notice the four keys at the top of the number pad are marked with arrows. If you press number 9, you will have slow reverse, press number 8, you have fast reverse, press number 7, you have fast forward and if you press the blue arrow button, you have slow forward. This is in essence manual programming.
Programmable mode
Using the program method can seem tricky at first but as you can see in our knowledge base video, if the steps are done correctly, then performing a different range of cuts sequentially presents no major problems, and it is here that our YouTube tutorial really helps.
If we press the F again, you cancel everything to a value of zero. Zero is one of the cuts so zero represents your first cut. Pressing the blue ‘>’ button moves along the line to the end value, where you could choose to make one cut, three cuts, or even six of those initial cuts, as many as you like up to ten.
Pressing the arrow once more allows you to enter the size you want to cut for that first cut and how many. Then press the blue arrow and number one starts flashing. This is now the point where we enter the details of our second cut, and how many we need. So as you can see we will program the machine to cut one of these. We’ll hit the arrow again and we’ll put it in a new figure. Press the arrow again and now we’re on cut number 3 and so on, if you want to finish at that point and not at the fourth cut, basically go to zero now and press start. Simply press the pedal and the machine will start stroking. And as you can see, the machine will run through the program straight away through to the end.
Published 10th March 2017

